Knowing where to concentrate your efforts and what areas to avoid on the various maps in the game can drastically improve your survivability and your contribution to your team.
Hunter[]
The map, "Hunter," is made unique by the fact that it only has one radar base. positioned in the exact center of the map. Unsurprisingly, this means that a large portion of the combat revolves around the center island. It's an extremely important point to maintain control of, but also one which must be approached with caution.
Since the center radar island is such a point of contention, the nearby Airfield and Army Bases to the northeast and southeast often see a lot of activity spillover, so caution should be exercised in this region as well.
The southern half of the map typically sees less action than the center and north halves of the map. However, this makes it a good region to attempt to break through or simply acquire some more breathing room. A coordinated push through the south can often put some effective pressure on enemies lined up on the western side of the radar island, or allow you to assassinate some enemy carriers hiding in the southeast corner.
Be sure that you don't ignore your "gimme's," the airfields and other bases near your team's spawns. These are free for you to take, and ignoring them puts you at a massive disadvantage. Making sure you take control of those airfields especially will keep your flagship at full capacity, even if you lose control of the front.
Denmark Strait[]

Denmark Strait presents an interesting and often-hectic set of challenges. First and most obviously, it's a map that is asymmetrically balanced: one team has the radar base in the far north as their "gimme," while the other has the airfield in the far south. These bases are the only advantage either team has going for them on an otherwise completely open, stalemate of a map. As such, capping your respective base at the beginning of a round is ABSOLUTELY VITAL. It should go without saying, and yet it's disturbing the frequency with which I see teams completely ignoring their only base. If your team ignores its only base, you should expect to lose.
Conflict is pretty much guaranteed to begin and center around the northern radar island. Those on the alpha team who spawn in the north should rush to the island as quickly as possible, begin capping, and send scouts to illuminate the opposite approach to the island. Bravo team's northern spawn group will be doing the same, and although they spawn significantly farther away from the island than the alpha team, they don't take long to reach it. The faster they can contest control of the radar, the easier it will be for them to neutralize it with long range shells and force the alpha team off the point entirely.
The battle tends to stay on the northern edge of the island, as both sides usually strive to stay within gun range of the radar base itself, should control suddenly flip and shelling become necessary. However, a well-coordinated and well-timed push around the southern end of the island can frequently dislodge an enemy team.
Those who spawn in at the southern end of the map will have a choice to make. They can either start racing across the bottom of the map immediately, or wait around their spawn point for 1 minute until they can teleport up north and help the rest of the team. Most of the time, teleporting north is the right choice to make. However, especially if there are CVs present in a match, it can be a good idea for a small squad of DDs, cruisers, and a battleship or two to sneak across the bottom of the map to try to hunt down the enemy carrier(s). This is particularly beneficial for alpha team, as they can attempt to capture the airfield from bravo team, even if they fail to find any carriers. Bravo team must always keep one eye on the south half of the map to make sure their base and their precious carriers are not being threatened by an enemy push.
Should you lose the fight for the radar island, try to fall back and drag the enemy toward your nearest spawnpoint. You'll be out of the line of sight of the radar island, and your spawnpoint will provide a small amount of free spotting for you, occasionally giving you just enough of a chance to turn the fight around.
Archipelago A[]

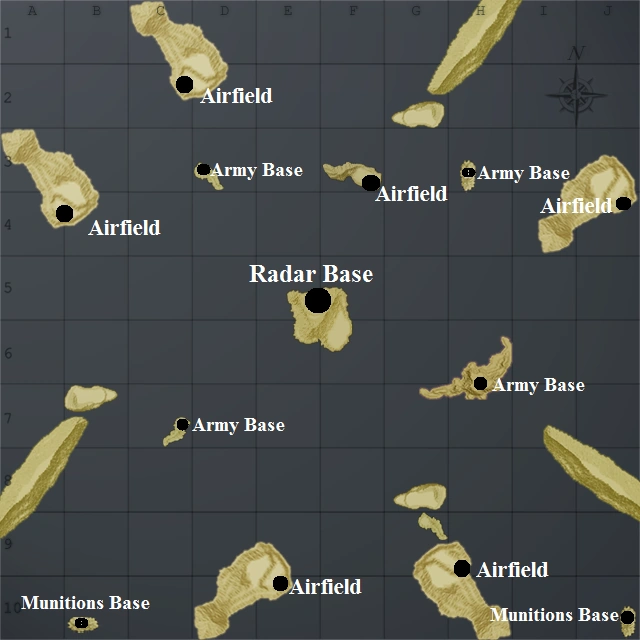
This map is fairly symmetrical, and therefore often yields a kind of "red rover" situation. Battle lines become well-defined, and if you stray out of them carelessly, you'll find salvo after salvo descending on you in short order, especially if both teams have each other well-scouted. Breaking the stalemate requires knowing when to push. Pay attention to when the enemy has scouts overhead. When they are blind, take the opportunity to push. If they drop back behind their islands in the D or G columns (depending on which side you're on), use that chance to shell their islands unopposed, and rob them of that vision as well. Continue pushing them back, and you'll find victory.
Due to the importance of the radar bases, it's not uncommon to find teams splitting in a highly uneven fashion. That is to say, the vast majority of the team will go one direction, leaving few or no team members going the other way. When this happens, an early push can often happen, especially if initial scouting reveals that there are few or no enemies in the direction where your team mobbed. Learn to spot these tendencies and respond to them as necessary. If you see a disproportionate number of teammates heading in one direction, expect an early enemy push from the opposite direction, and be prepared to counter it.
You'll start the game with a free Airfield and Munitions Base (the island at B8 for alpha, and H2 for bravo). However, do NOT ignore the other "gimme" Airfields at B3 and I8. Should your team get pushed back, you'll want these islands under your control, so as to provide vision and a redundant Airfield for your flagship. Watch out for DDs and APAs sneaking around the far northern and southern Airfields, as they will frequently try to swing around and capture these gimmes out from under you.
Archipelago B[]

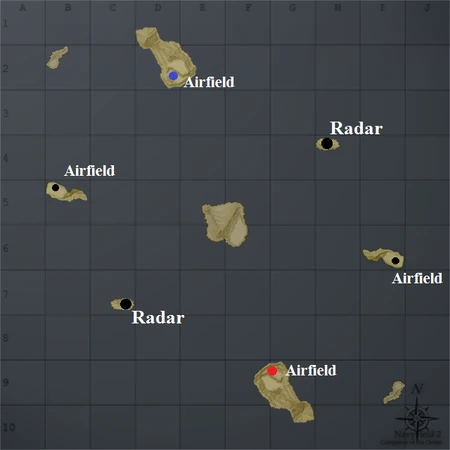
Like its sister map, Archipelago B tends to produce well-defined battle lines on a field that's larger than it first appears. The island layout tends to separate the battle into two distinct zones of conflict on either side of the map, so it's important to split your team's forces evenly. Keep in mind the advantages of the different types of bases when deciding which flank to choose.
Once that's taken care of, it can be helpful to think of the battle as a kind of island-hopping campaign. The first contact occurs between the radar and airfield islands on either side of the map. If you're victorious, you can move up, cap the base from the enemy, and then determine your next move: either push farther forward and cap the enemy's "gimme" out from under them, or push to the corners of the map in search of enemy carriers. However, whichever flank you choose, you should always keep a close eye on your other flank via the minimap, as often the best choice once you've won your flank is to swing around the center island and hit the enemy's other force in the side or rear.
With this in mind, you'll want to stall the enemy as long as possible around your friendly island if you start to lose ground. Try to keep them away from your "gimme" airfield and friendly carriers, so your other force doesn't get outflanked and has more time to defeat their adversaries and come to your aid.
For most of the game, though, you'll want to avoid the area around the center island. It's difficult to sneak around, as the line of sight of islands, scouts, and teammates covers much of the area around it, and you'll wind up drawing attention from both sides of the map instead of just one. However, there are occasions where it can be advantageous. For example, if your team is pushing the enemy on one or both flanks, and you're nearer to your spawn deciding your next move, it can be advantageous to hug the island and hit the enemy from a different angle than the rest of your team.

-NavyField 2- Map- Archipelago B